


The Asado Grill should be placed on a level non-combustible hard base. The unit, and even some of the parts, are heavy - take caution when lifting.
On the bottom of the feet, there are bolts that can be loosened or tightened to help with minor leveling of the unit. There should be airflow all around and under the unit plus space above the unit for the heat to dissipate. Remove any and all laser paper film from the unit and its parts.
Put the charcoal tray in the unit. Do not have a fire without the charcoal tray in the unit. You can light a wood, charcoal, or a combination of wood and charcoal fire. The unit will get warm to hot depending on the size of the fire and length of time of the fire so caution is required before touching any part of the Asado Grill. Long hot fires can cause some minor distortions to the charcoal tray. The unit with the charcoal tray in it can be enjoyed as a bonfire. No fire should be left unattended.
Typically you would start the fire and then add the grills once the fire is going. The grill with the opening is put in the center. You can have an all wood or an all charcoal fire but typically it is a combination of the two. Typically you have a teepee shaped wood fire through the center opening. Charcoal is added through the center opening. Once the charcoal or wood is heated, it can be moved around the grill with the poker as needed. The lower slots are for airflow for the charcoal tray. You use the upper slots to put the poker through to move the coals around.
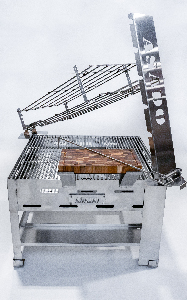
There are two bases for the grilling rack. These bases can be placed in any corner depending on which way the wind is blowing but they need to be placed kitty-corner to each other. Make sure that these bases are in the bottom slot of the foot – also ensure they are firmly all the way down in place at the top, with the lip between the top edge of the unit and the grills. Attach the piece with the Asado name cut out of it. The nut and bolt are provided and it only needs to be finger tight. Lean it back when finished. The longer piece of the meat rack is considered the bottom. Place the bottom meat rack on a flat surface with the slots pointing upwards. Put whatever you are cooking on the rack. Place the top of the meat rack into one of the slots on the bottom of the meat rack. Push the top of the meat rake so that it slightly compresses what you are cooking. Slide the pin through the square, through the slot on the rack, and through the square on the other side. If what you are cooking is loose, move your pin down a square. If you struggle to get the pin through, move the pin up a square. Place the pointed end of the meat rack into its base. Move the top of the meat rack to line up with the slots in the rack holder. Pick whatever slot is best. If it is a hot fire, you may want to pick an upper slot. If it is a low fire, you may want to pick a lower slot. When turning the rack over, turn so that the rounded end of the pin faces upwards and the pointy end of the pin faces downwards – you don’t want the pin to fall out when turning the rack over. The meat rack will get warm to hot so use caution when touching to meat rack.
The side table can be placed in any available corner. Ensure the bottom is in the foot slot and the top is all the way down in place at the top, with the lip between the top edge of the unit and the grills
The cutting board holder can be put anywhere along the edge of the grill. Move the coals away from the area to which you are going to attach the cutting board. We do not want you or the cutting board to get too hot. Put the cutting board on its holder when you are using it. Remove it when you aren’t using it as we do not want the cutting board to dry out and reduce its life span.
The rotisserie can be placed anywhere on the edge of the grill. The motor end and the other end need to be directly across from each other.
The hotplate can be placed anywhere on the grill. The hotplate is good for cooking items that could otherwise fall though the grill – pancakes, eggs, onions, mushrooms, vegetables, fruits, etc.
The cloche can be used anywhere on the grill. It fits the hotplate to help cook those items but can also be placed over items on the grill to help melt cheese as an example.
Ensure the fire is completely out before putting the top on. All the attachments need to be removed but can be stored on the racks under the unit. The grills should remain in place to give the top added support. The top turns the grill into a fully functioning coffee table.
Cleanup is done with soap and water or stainless steel cleaner. There is a drain hole on one side so you can put a bucket under the drain hole and hose the unit out.
The wood cutting board and the rotisserie motor should be stored indoors when not in use. The grill, and all its parts, can remain outside and be enjoyed all year long.


