


The Catena Grill should be placed on a level non-combustible hard base. The unit, and even some of the parts, are heavy - take caution when lifting.
On the bottom of the feet, there are bolts that can be loosened or tightened to help with minor leveling of the unit. There should be airflow all around and under the unit plus space above the unit for the heat to dissipate. Remove any and all laser paper film from the unit and its parts.
Put the charcoal trays in the unit. While standing in front of the unit, tilt the tray on an angle down and place the tray on the bottom lips. Move the tray to one side and install the second tray. Position the trays so that there is a small gap between the trays and at the ends so air can flow around them. Do not have a fire without the charcoal trays in the unit. You can light a wood, charcoal, or a combination of wood and charcoal fire. The unit will get warm to hot depending on the size of the fire and length of time of the fire so caution is required before touching any part of the Catena Grill. Long hot fires can cause some minor distortions to the charcoal tray. No fire should be left unattended.
Typically you would start the fire and then add the grills once the fire is going. You can have an all-wood or an all charcoal fire or a combination of the two. The lower back slots are for airflow for the charcoal tray. Fireproof pots can be placed directly on the coals.
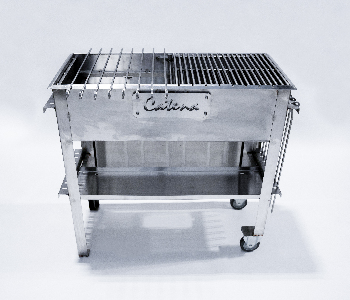
There are 2 grills and there are two different levels that the grills can sit on. The grills can both be on the top level, both on the lower level or one on each level.
To install the grill on the lower level – Stand in front of the grill and lift the left side of the grill up so that the grill is on an approximately 30 degree angle. Slide the lower angle under the center bar and onto the lower grill lips. Slide the grill to one side and repeat if installing a second grill on the lower lips.
Remember, the charcoal trays get installed from the front and the grills get installed from the sides.
The grill lifters are used to lift or move the grill which is helpful if the grill is dirty or hot. The lifter needs to run parallel with the top grill rods. With the lifter on an angle, line up the slot in the lifter with the center support rod that runs under the grill. Move the lifter to one side of the grill and lower the lifter so it passes the top rod and lifts so the top rod sits in the trough of the lifter. Repeat with the other lifter on the other side of the grill. Remember that grills go in and out from the sides.
When using the skewers, the grills are generally not used or put on their lower level. The end with the point is at the back of the unit and the end with the loop is at the front of the unit. The unit was designed so that the skewer sits in the slot and does not rotate. You pick up the front of the skewer rotate it as needed (the back of the skewer remains in its slot) and set it back down in its slot.
The rotisserie can be placed anywhere on the edge of the grill. The motor end and the other end need to be directly across from each other.
The hotplate can be placed anywhere on the grill. The hotplate is good for cooking items that could otherwise fall though the grill – pancakes, eggs, onions, mushrooms, vegetables, fruits, etc.
The cloche can be used anywhere on the grill. It fits the hotplate to help cook those items but can also be placed over items on the grill to help melt cheese as an example.
Ensure the fire is completely out before putting the lid on. All the attachments need to be removed but can be stored on the rack under the unit. The grills should remain in place to give the lid added support.
Cleanup is done with soap and water or stainless steel cleaner. There is a drain hole on one side so you can put a bucket under the drain hole and hose the unit out.
The rotisserie motor should be stored indoors when not in use. The grill, and all its parts, can remain outside and be enjoyed all year long.


